A Beginner's Guide to Cognito for Web Applications


Amazon Cognito is a cloud-based, serverless solution for identity and access management. It provides similar capabilities as Auth0 and Okta. The main benefit of Cognito is that it is just another services within the AWS suite of services, and can thus easily be used if other parts of the stack already use AWS.
However, identity and access management are often tricky to implement, and Amazon Cognito is no different in that regard. In this article, I therefore want to provide a beginner's guide to get a basic setup with Cognito up and running. Specifically we will cover:
- 👀 Overview of example application
- 📚 Explanation of key concepts we need to understand
- 🤗 Singing up and authenticating users in a web application
- 🚪 Securing endpoints in a server-side API
- 🛠 User management
This tutorial will strictly focus on authentication: validate that a user is who they claim they are. We will not cover authorisation—although this is also something Cognito can help us with as well.
tldr;
As with my other tutorials and guides (see e.g. DynamoDB and Serverless React SSR), I provide a ready to use template and boilerplate/example project. These can help you jump start your project without having to fiddle around with the basic setup:
- 🛠 Configurable Template: User Management Template
- 📦 Boilerplate: Source Code
- 🚀 Example project: Source Code Live Demo
Any code examples provided in this article will be taken from the boilerplate/example project. The template, boilerplate and example project are completely free and open source.
What you will learn to develop
Before you embark on the journey of understanding how you will get authentication to work for your serverless application, I want to provide a brief overview of the solution that can be developed using the concepts and code discussed in this article.
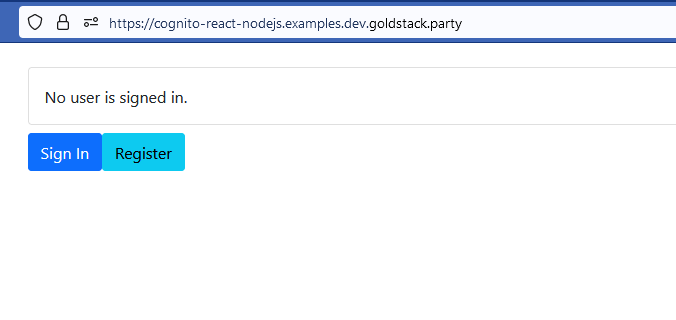
Simple React UI
A simple user interface in React: see demo.
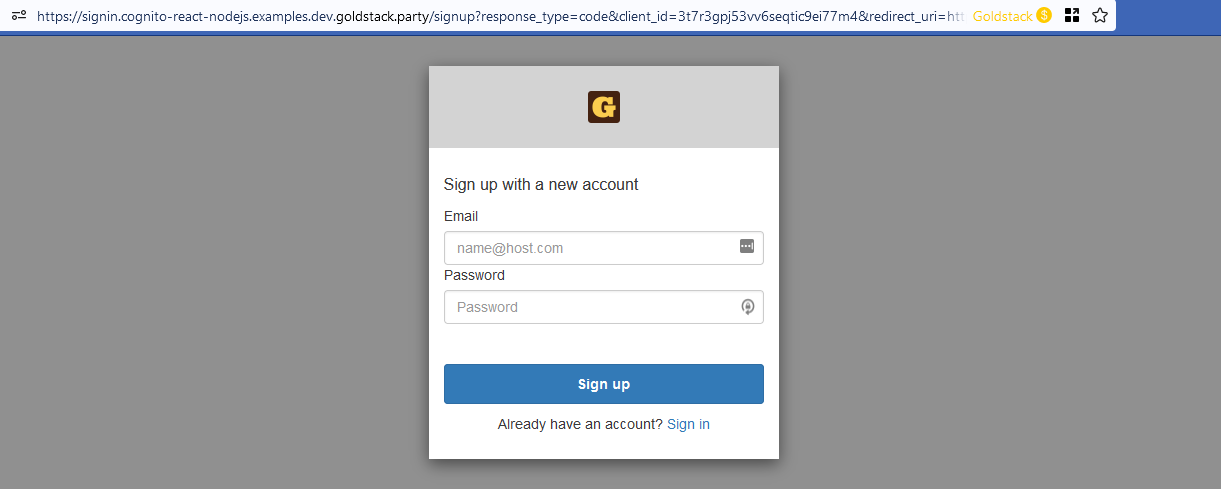
Registration
Upon clicking the Register button on the UI, the user will be redirected to a UI provided by Amazon Cognito that allows the user to register with an email address and password:
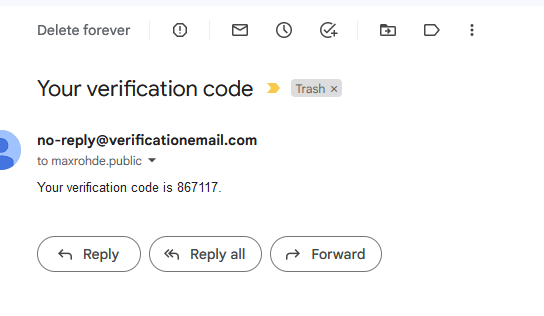
Upon providing an email address and password, the user will receive an email with a confirmation code that needs to be entered in the registration user interface to complete the registration process.
Signing in
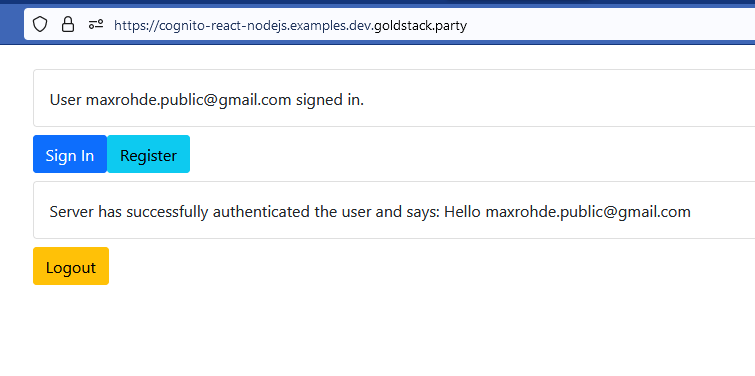
Upon successful registration, the user is redirected to the original application and automatically signed in:
For users that already have an account, clicking the Sign In button will redirect them to a user interface for signing in.
Server-side authentication
The example project utilises server-side rendering. The server authenticates the user and upon successful authentication the server renders: Hello [email] into the HTML page send to the client.

Logout
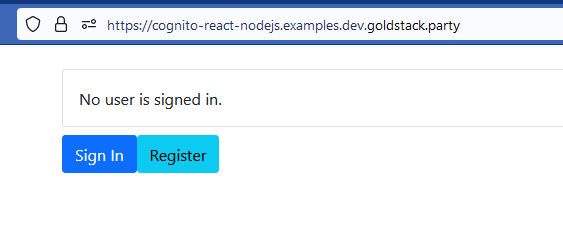
Finally, clicking the Logout button on the UI will log out the user and redirect to the sign in screen:

While the functionality in this example project appears relatively straightforward, there is both theoretical and technological complexity to deal with to make everything work.
However, once you have understood the concepts and technologies discussed in this article, you will be able to build an extremely low-cost, scalable and secure solution for user management.
Key Concepts
To get some piece of code working, it is often enough to do a few quick Google searches and copy bits of code from here and there. This is not advisable for authentication.

You need basic grounding in a number of concepts to get a decent solution put together. Principally, you need to learn a bit about OAuth 2.0 and Amazon Cognito; both of which are covered in the following sections.
OAuth 2.0
OAuth 2.0 is an Internet Standard (see RFC 6749). Like other standards such as HTTP or SMTP, this standard is implemented in many applications, frameworks, services, and servers.
Popular services and servers implementing the OAuth 2.0 standard are:
OAuth 2.0 aims to provide both security and convenience for developers. One of its most attractive features is that it enables application owners to authenticate users without needing to store and manage users' passwords.

Naïve Authentication (Don't do this)
Let's first start with a naïve implementation of user authentication:

In this implementation, the user enters the username and password in the browser. We then send username and password to the server, which checks the credentials against those stored in a database.
If the credentials are correct, the server will issue a session id, which the client can include with future requests without further need to provide the username and password.
This implementation requires us to store passwords (or better the hash of passwords in our database). This can easily result in serious security issues. Thus don't do this unless you absolutely have to.
OAuth Authentication Flow
OAuth 2.0 provides us with a better way to authenticate users. OAuth 2.0 is an extensive standard, and it offers multiple different authentication flows to authenticate users.
I will only describe one possible flow here, the one we will implement later in this article.
This flow consists of the following steps:
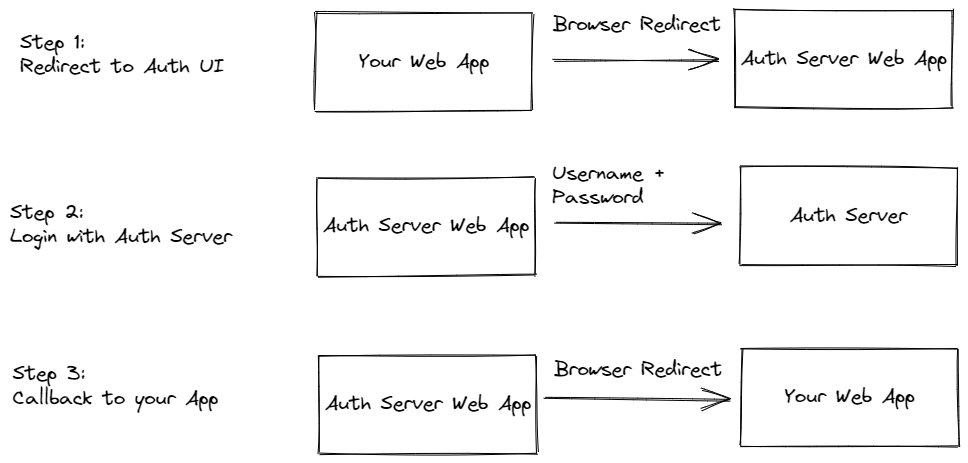
Step 1: Redirect to Authorisation UI
Rather than making an API call from our application with the username and password, we redirect the user from our web application to a web application hosted by our authorisation server.
So for instance, if your application is hosted at the URL https://myawesomeapp.com, you redirect the user to https://auth.myawesomeapp.com or https://auth.cloudprovided.com.
Step 2: Login with Authorisation Server
The user then provides their username and password on that page, and the authorisation server validates the provided credentials. We are not limited by simple username and password credentials here. Authorisation servers may implement two-factor authentication and/or other mechanism.
The hosted web application of the authorisation server may also store cookies for already known users. Thus, if a client has been authenticated before, the authorisation server may not require the user to re-enter their credentials—but instead validate the information stored on the client
Step 3: Callback to your Application
When the user could be successfully authenticated, the authorisation server web application will redirect the user back to your application. The URL used to call back your application contains an authorisation code. For instance, the URL the user is redirected to, may look like:
https://myawesomeapp.com?code=xxxxxxxxxxx
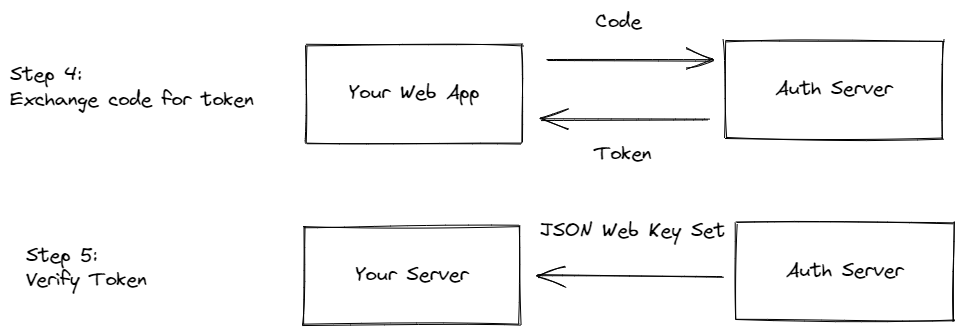
Step 4: Exchange Code for Tokens
The application can then call the authorisation server API to exchange this code for a set of tokens.
You can either call the authorisation server API directly from our web application, or you could send the code to your server and have your server call the authorisation server API. The latter option would ensure the user's web browser would never have knowledge of the generated tokens. However, this requires to implement some degree of session management for your server.
The tokens you get in exchange the code are:
- ID Token: The id token contains information about a user's identity, such as name, email address or phone number.
- Access Token: The access token contains information about what resources the authenticated user should be given access to.
- Refresh Token: The refresh token can be used to request a new set of tokens from the authorisation server.
All these tokens are defined as JSON Web Tokens also known as JWT.
The id token and access token work in a quite a genius way. It is very easy for any application to parse them and extract the information they provide, for instance to obtain a user's email address from the id token.
Step 5: Verify Tokens
However, you shouldn't just read the information from these tokens and trust the information they provide. Instead, you should verify the tokens first.
You verify the token by downloading a public key provided by the authorisation server, provided in a JSON Web Key Set (JWKS). Usually, these are provided in a URL such as the following:
https://auth.yourapp.com/[...]/.well-known/jwks.json
After you downloaded the public key, you can verify the tokens with this key. There are plenty of libraries available for this, see this list maintained by OpenID.
After you have verified the tokens, you can trust the information the tokens contains and use them in your application logic.
OAuth Authentication Flow: Some Security Hardening
OAuth 2.0 is an extensive standard, and it defines a number of optional features that help against common vulnerabilities.
One common vulnerability is the so-called redirect interception. We can protect against this by using PKCE (Proof Key for Code Exchange).
PKCE works by including a code challenge when initially redirecting the user to the authorisation server web application. For this, you generate a so called code verifier (a random sequence of characters). Then you generate a hash using SHA-256. You include the hash in the URL you redirect the user to:
https://auth.yourapp.com/loginui?...&code_challenge=[hash of code verifier]
You need to store the code verifier on the client, for instance in the browser's local storage.
When you exchange the authorisation code provided in the callback URL to your web application for tokens, you include the code verifier in the request.
The authorisation server will only issue the tokens, when the supplied code verifier matches the code challenge you have supplied with the initial request.
Cognito Concepts
After covering some OAuth basics, it is now time to have a look at the specific technology used for the authentication server: Amazon Cognito.

I will not cover every aspect of Cognito here—instead, I will only focus on what is required for the example application.
Specifically, I will cover:
- User Pools
- Application Clients
- Hosted UI
- Endpoints
I will also show how to configure each of these using Terraform. In this section, I will reference the boilerplate project, cognito-nodejs-template, which will be automatically updated.
User Pools
User pools in Cognito are essentially a database of users combined with some capabilities to sign up and sign in users.
User pools can be configured to allow users to sign up with their social logins (e.g. Google Account, Facebook account) or via users created directly with Cognito.
The following snippet contains the configuration for the user pool used in the boilerplate project (main.tf):
resource "aws_cognito_user_pool" "pool" {
  name          = var.user_pool_name

  # Add your app name to the below
  email_verification_subject = "Your verification code"
  email_verification_message = "Your verification code is {####}."

  schema {
    attribute_data_type = "String"
    name                = "email"
    required            = true
    mutable             = true

    string_attribute_constraints {
      min_length = 1
      max_length = 100
    }
  }

  username_attributes      = ["email"]
  auto_verified_attributes = ["email"]

  password_policy {
    minimum_length    = 6
    require_lowercase = false
    require_numbers   = false
    require_symbols   = false
    require_uppercase = false
  }

  device_configuration {
    challenge_required_on_new_device      = true
    device_only_remembered_on_user_prompt = false
  }
}
Since the User Pool describes a database of users, you need to define what kind of data you want to store for users. This is defined in the schema property above.
In the boilerplate project, we configure only one attribute for users: email. This allows storing an email address for users.
I recommend defining the absolute minimum of attributes for users possible. This is due to the restriction that it is difficult to change the attributes later on. Thus, we only define the email attribute here—since we plan to capture and validate it for our users.
We also define a password_policy for passwords users need to define. The User Pool in the example has a very permissive password policy—but you can change that easily by modifying main.tf.
Cognito provides some very powerful feature for us by allowing us to validate user email addresses automatically. This is achieved by setting the property auto_verified_attributes = ["email"].
Setting this will cause Cognito to send an email with a unique code to new users. Only upon entering this code back with the Cognito users interface will the users be validated and be able to access the application.
Application Clients
Cognito can be used with different client applications; chiefly, both web and mobile applications. You need to provide specific configuration for every client you want to use.
In our example, we are only interested in allowing users to sign up through their web browser. Thus, we are defining a web client.
This is configured in web-client.tf in the boilerplate project:
resource "aws_cognito_user_pool_client" "client" {
  name                                 = "${var.user_pool_name}-client"
  user_pool_id                         = aws_cognito_user_pool.pool.id
  callback_urls                        = [var.callback_url]
  default_redirect_uri                 = var.callback_url
  allowed_oauth_flows_user_pool_client = true
  allowed_oauth_flows                  = ["code", "implicit"]
  allowed_oauth_scopes                 = ["email", "openid"]
  supported_identity_providers         = ["COGNITO",
    # uncomment this to enable login with Google
    # - remember to provide your application details in identity-providers.tf
    # aws_cognito_identity_provider.google_provider.provider_name
  ]
}

resource "aws_cognito_user_pool_domain" "main" {
  domain               = data.aws_acm_certificate.wildcard.domain
  certificate_arn      = aws_acm_certificate.wildcard.arn
  user_pool_id         = aws_cognito_user_pool.pool.id
  depends_on = [
    aws_acm_certificate_validation.wildcard_validation,
  ]
}

resource "aws_cognito_user_pool_ui_customization" "ui" {
  css        = ".label-customizable {font-weight: 400;}"
  image_file = filebase64("favicon-32x32.png")

  # Refer to the aws_cognito_user_pool_domain resource's
  # user_pool_id attribute to ensure it is in an 'Active' state
  user_pool_id = aws_cognito_user_pool_domain.main.user_pool_id
}
We need to enable OAuth in our client configuration to support the OAuth based authentication flow we have defined above.
We configure the example application to allow sign up by providing an email or via Open ID.
However, to enable Open ID, additional configuration needs to be provided in identity-providers.tf, such as the identity of our application with the Open ID provider.
The above client configuration also provides some minor customisation of the user interface presented to users during sign up and sign in using the resource aws_cognito_user_pool_ui_customization.
Cognito by default hosts the UI for users on an Amazon owned domain. However, we customise the domain name here to allow users doing the sign up and sign in on a domain we own. This is accomplished using the resource aws_cognito_user_pool_domain.
Lastly, we need to define a callbackUrl. This is the URL in our web application that users are redirected to after a successful sign in. Cognito supports multiple callback URLs but we only provide one here.
Endpoints
After we have configured our User Pool and Application Client, Cognito will host a number of endpoints for us.
These are all hosted under the custom domain we have configured for the Application Client.
The following endpoints will be provided:
Sign In
https://{domain}/oauth2/authorize
An UI that defaults to allowing users to sign in, but also allows users to sign up or reset their password or recover a lost password. Redirect users to this page to initiate the OAuth sign up flow.
Sign Up
https://{domain}/signup
An UI that default to prompting users to sign up for the application.
Get Token
https://{domain}/oauth2/token
An endpoint you can make a POST call to obtain the Access, Identity and Refresh tokens, given a valid code supplied during the authentication flow.
Logout
https://{domain}/logout
Redirecting users to this URL from your web application will force them to log out.
Note that all these endpoints need to be parameterised using information from your application, Application Client and User Pool. The provided boilerplate template uses a library to construct the correct URLs, source code for the library can be found in cognitoEndpoints.ts:
  switch (args.endpoint) {
    case 'authorize':
      return (
        `${baseUrl}/oauth2/authorize?response_type=code` +
        `&client_id=${deploymentOutput.terraform.user_pool_client_id.value}` +
        `&redirect_uri=${deployment.configuration.callbackUrl}` +
        '&code_challenge_method=S256' +
        `&code_challenge=${await getCodeChallenge()}`
      );
    case 'signup':
      return (
        `${baseUrl}/signup?response_type=code` +
        `&client_id=${deploymentOutput.terraform.user_pool_client_id.value}` +
        `&redirect_uri=${deployment.configuration.callbackUrl}` +
        '&code_challenge_method=S256' +
        `&code_challenge=${await getCodeChallenge()}`
      );
    case 'token':
      return `${baseUrl}/oauth2/token`;
    case 'logout':
      return (
        `${baseUrl}/logout?response_type=code` +
        `&client_id=${deploymentOutput.terraform.user_pool_client_id.value}` +
        `&redirect_uri=${deployment.configuration.callbackUrl}` +
        '&code_challenge_method=S256' +
        `&code_challenge=${await getCodeChallenge()}`
      );
  }
Signing Up and Authenticating Users
Once Cognito is configured correctly as outlined above, you can start signing up users for your application.
There are multiple ways to do this, but generally you begin by redirecting users from your web application to the URLs described in the previous section.
In this section, I will reference the example project: cognito-react-nodejs-example as opposed to the boilerplate project (cognito-nodejs-template) referenced in the previous section.
The example project won't be automatically updated like the boilerplate project. But it provides an integrated example that contains both the Cognito configuration as well as a simple web interface, which will make it easier to follow along the concepts discussed in this section.
I have also wrapped a number of convenience functions in a library that is published to npm: @goldstack/template-user-management. The source code for this library is available here.
The example project utilises yarn workspaces and contains two packages:
packages/server-side-renderingto define the custom web application users interact with.packages/user-managementto define the Cognito configuration and a basic wrapper around the Cognito API.
I love workspaces since the allow developing fullstack applications in a clean, modular manner. For more information on the how and why of the basic project setup, please see my article The Ultimate Guide to TypeScript Monorepos .
Our simple application contains just one screen that is defined in the server-side-rendering package: $index.tsx.
I abbreviate below the key logic for authentication provided in the index handler:
import {
  getLoggedInUser,
  handleRedirectCallback,
  loginWithRedirect,
} from 'user-management';

const Index = (props: { message: string }): JSX.Element => {
  const user = getLoggedInUser();
  handleRedirectCallback();
  return (
    <>
      {!user && (
        <button
          onClick={() => {
            loginWithRedirect();
          }}
        >
          Sign In
        </button>
      )}
    </>
  );
};
Importing the user-management package allows accessing a number of convenience methods required for interacting with Cognito from the web application. See the module users.ts in the user-management package for reference.
The method getLoggedInUser() will return us the identity and access token for the user if a user is logged in.
The method handleRedirectCallback() performs the logic the client needs to go through for the application flow. Specifically, the method:
- Checks if there is a
?codeparameter in the URL - If there is, call the
tokenendpoint with the providedcodeto obtain the user tokens (identity, access and refresh). - This method will also use a refresh token (if available) to obtain new identity and access tokens
The method loginWithRedirect will redirect the user to the Cognito provided UI if the user is not authenticated yet.
The page defined in $index.tsx uses a few further methods:
signUpWithRedirect()which works just likeloginWithRedirect()but defaults the Cognito UI to the sign up as opposed to the sign in flow and is hooked up the Register button in the sample application.performLogout()which will log out the user.
Securing Endpoints
Once you have obtained the tokens on the client-side, you can send them back to the server—by default the template will write them into a client-side cookie, but you can also send them along as Bearer Tokens in headers for custom requests.
In the server-side logic, you can again import the user-management module. Using the method connectWithCognito, you can validate the access token and identity token passed from the clients:
import { connectWithCognito } from 'user-management';

export const handler: SSRHandler = async (event, context) => {
  const cookies = getCookies((event.cookies || []).join(';'));
  if (cookies.goldstack_access_token) {
    const cognito = await connectWithCognito();
    await cognito.validate(cookies.goldstack_access_token);
    const idToken = await cognito.validateIdToken(cookies.goldstack_id_token);
    message = `Hello ${idToken.email}<br>`;
  }
};
See the index route server-side handler in the example project for a complete source code reference.
Note that it is extremely important to call the validate() methods on the tokens, and not just directly decode them to read their contents. Our API will only be secured if we validate the tokens.
User Management
Once we have signed up users for our application, we may need to do some administrative work with them; such as resetting passwords or exporting the list of all our users.
We can do this easily using the AWS Console. Search for the service Cognito and then select Manage User Pools.
Then select the user pool we have created and go to General Settings / Users and Groups. Here we can see a list of all signed up users:
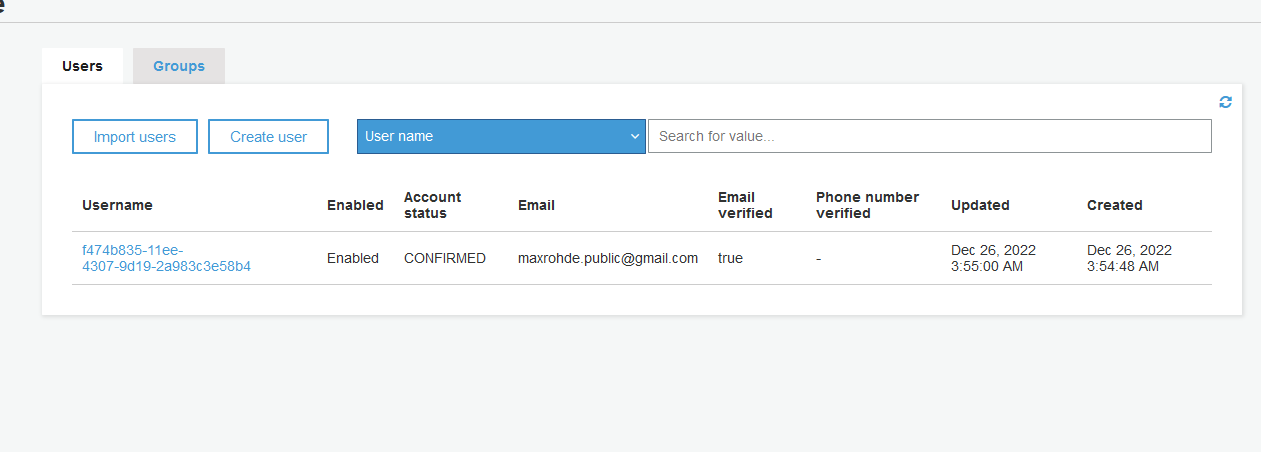
Please do not change any other settings in the AWS console. All changes to the user pool configuration should be done by modifying the provided Terraform configuration files.
Conclusion
Many applications will require the need to register and identity users. Unfortunately, providing user authentication features can become quite complicated.
In this article, I have shown how to create a simple application that allows signing up and signing in users securely.
Amazon Cognito solves most of the hard problems for us. For instance, there is significant complexity involved in handling email verification or a functionality to recover last passwords.
By using the default solutions provided by Cognito, chiefly the hosted UI, we can keep our application light and focus it on the unique problems we want to solve.
However, as with any out-of-the-box solution, we sacrifice flexibility and extensibility. The example project, boilerplate and template provide all configuration in Terraform and can be modified to our needs—but that won't always be easy.
All in all, I highly recommend using an existing platform for managing customer identity. Auth0 and Okta are probably preferable to Cognito if you are not bound to AWS. For this article, I chose Cognito since I have been working on building a complete serverless stack for AWS.
In my articles, I go beyond providing code snippets and provide libraries and templates that give you a head start in getting your application up and running. You can help make the journey even easier for others, by reaching out to me with ideas to improve the article or, even better, by opening an issue on GitHub in the projects where the source code is hosted.